
How to Set Up a New Email Account on Your Apple Mac
Adding an email account on your Mac is a quick and simple process. Whether you’re setting up your first account or adding another one, Apple Mail makes it easy. This step-by-step guide will walk you through the configuration so you can send and receive emails without delay.
Step 1: Add a New Account
- Open the Mail app on your Mac.
- If this is your first time using Mail, the Add Account window will appear automatically.
- If you already have an account set up, go to the Mail menu and choose Add Account.
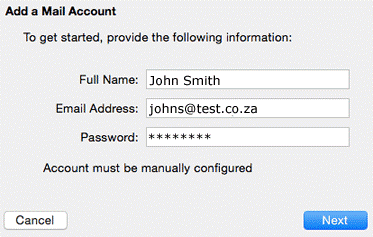
- Full Name: The name you want to display as the sender.
- Email Address: The full email address supplied by your service provider.
- Password: The password linked to that email address.
Step 2: Manual Configuration (If Required)
Sometimes Apple Mail cannot detect your email server automatically and will ask you to configure it manually.
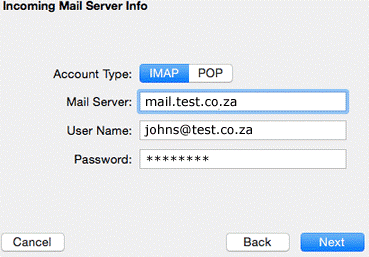
Incoming Mail Server
- Mail Server: e.g., mail.yourdomainname.co.za or the IP provided by tandohost.co.za
- User Name: Your full email address.
- Password: The password for your email account.
Click Next to proceed.
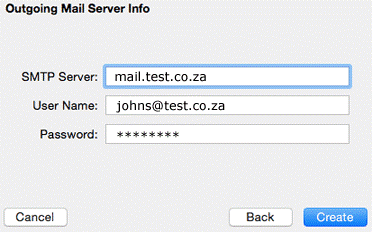
Outgoing Mail Server (SMTP)
- SMTP Server: e.g., mail.yourdomainname.co.za or the IP provided by tandohost.co.za
- Username: Your full email address.
- Password: The same password as above.
- Click Create.
Step 3: Adjust Account Preferences
- In the Mail menu, go to Preferences > Accounts.
- Select the new account from the list on the left.
- Under Advanced, uncheck Automatically detect and maintain account settings.
Step 4: Update Outgoing Mail (SMTP) Settings
- Return to Accounts and from the Outgoing Mail Server (SMTP) dropdown, choose Edit SMTP Server List.
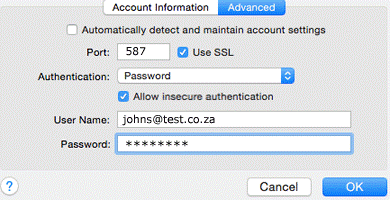
- Under Advanced, uncheck Automatically detect and maintain account settings.
- Configure the following:
- Port: Use 587 (without SSL) or 465 (with SSL). Avoid port 25, as many ISPs block it.
- Authentication: Select Password.
- If visible, check Allow insecure authentication. If this option doesn’t appear, update your Mail app to the latest version.
Additional Notes
Email Protocols
- IMAP: Stores emails on the server and syncs across all devices. Best if you use multiple devices.
- POP: Downloads emails to your Mac and often removes them from the server. Suitable if you only check mail from one device.
SSL Security
Always enable SSL encryption if possible. It secures your email traffic, ensuring your data stays private.
Troubleshooting
If something isn’t working:
- Recheck your server settings.
- Make sure you’re connected to the internet.
- Confirm your email password is correct.
- Update Apple Mail to the latest version for compatibility.
With these steps, your email account should be fully set up and ready to use on your Mac.

